As you know, we bought the boat cheap.....real cheap. Boats are never cheap without a reason and "Elixir" had a LOT of reasons! This is a chronicle of the major repairs we did to get her back to her previous claim as a "Luxury" yacht. Follow us as we restore the beauty that we could see lying beneath the chipped paint, weathered wood, and rusted machinery.

The first chore I tackled was the mast and boom.
OK, maybe it wasn't the most important thing to work on, but the badly chipping paint could be seen from shore and I knew that if it rotted, it would cost a small fortune to replace. What a difference it made to have a glossy white mast!

 |
| Before |
 |
| After |
 |
| Port Side (we can't get to yet) |
 |
| Starboard Side |

 This is what the Saloon A/C looked like. I spent hours trying to figure out where all those wires were supposed to go only to discover the compressor was shot! So it got replaced with the new unit on the right. The cool air is great but it turns out the new unit is taller and won't fit under the settee. For now I placed 2 x 2 boards to raise the seat up above the A/C and this winter I plan to re-locate it into the forward V-berth but still vented into the saloon. I think that will give better circulation anyway.

Whenever the shower or the sink in the Master Head was used, the water (along with toothpaste, soap, and whatever else) would just drain into the bilge. It would eventually be picked up by the bilge pump and be pumped overboard. In the meantime, as you can imagine, the bilge was nasty and had a foul odor. The white PVC pipe on the right of the picture on the left is the drain for the shower. Marie and I installed a shower drain box which catches all of the drainage and automatically pumps it overboard thereby keeping it out of the bilge! The tubing is just temporary since when we renovate the Head, I am going to install a larger drain pipe for the shower. Now I just have to clean up all the nasty stuff on the floor of the bilge. Yuk! I think I will wait for it to dry some first!


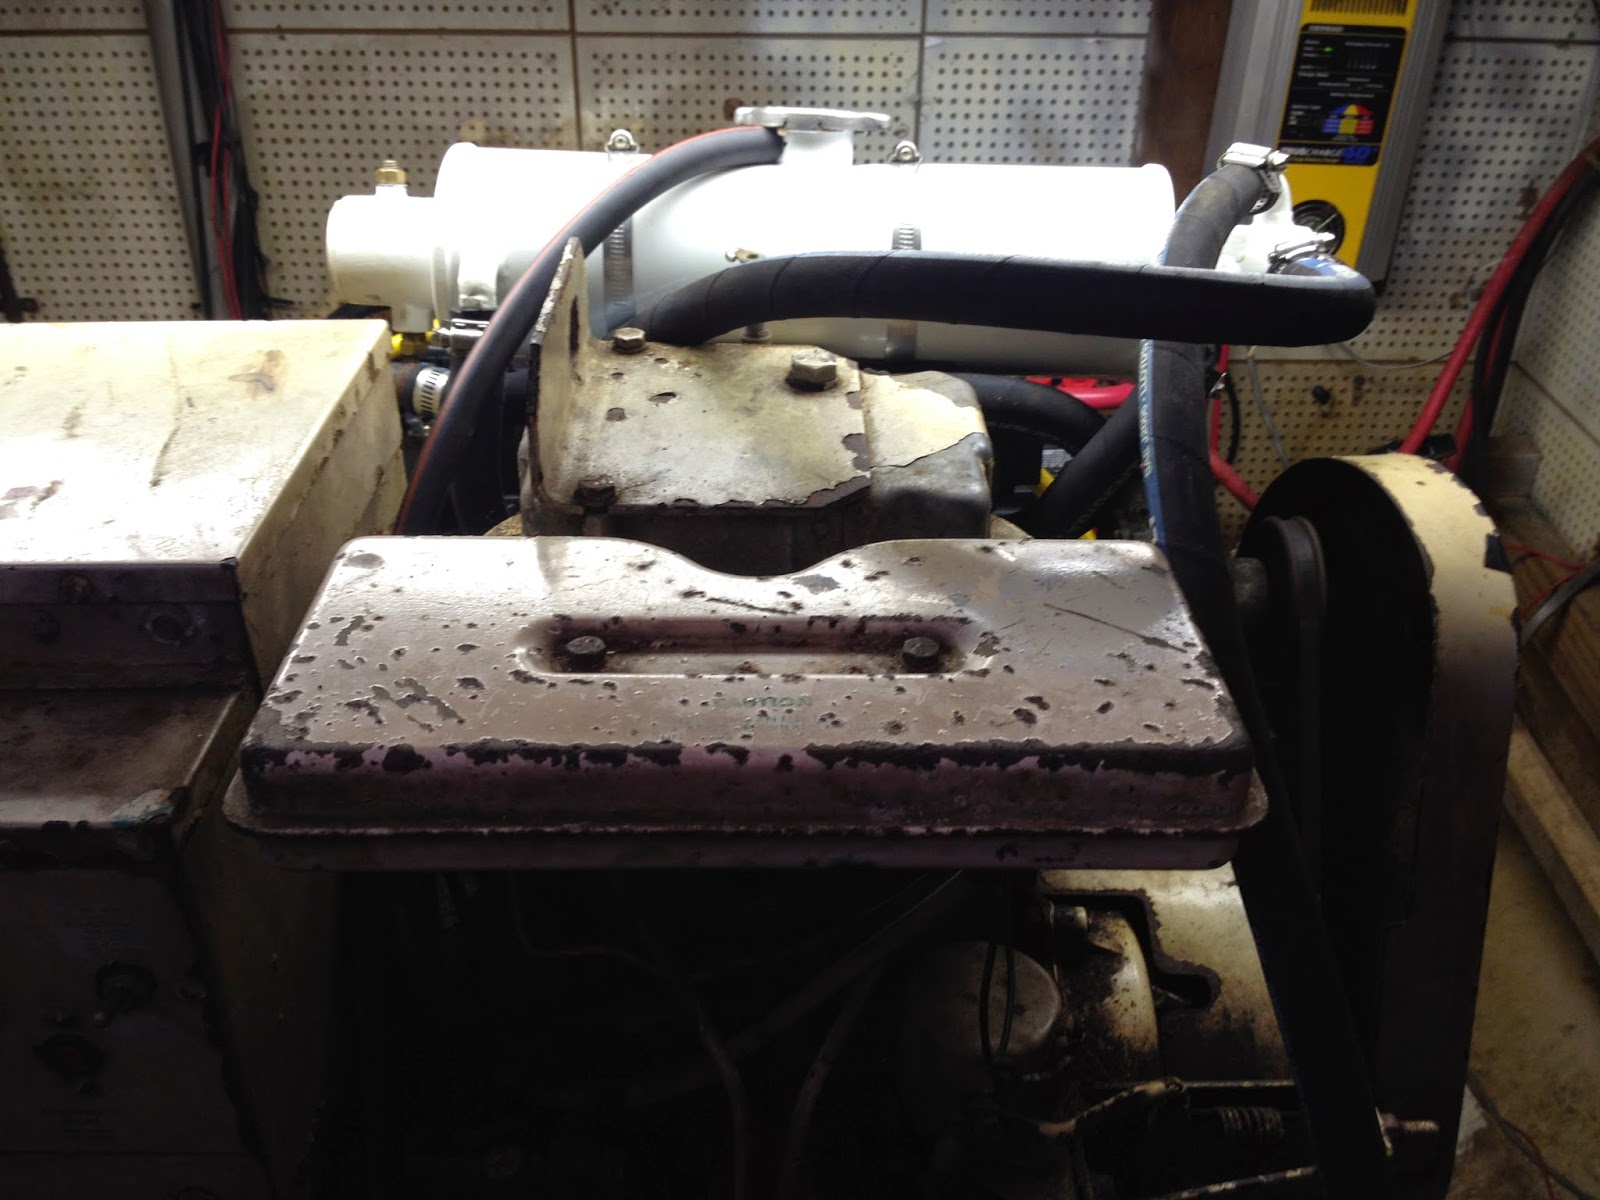
We finally got the parts to replace the old heat exchanger and the transmission oil cooler (top picture). These are the parts that caused the transmission to freeze up. As you can see by the middle picture, the heat exchanger was in pretty bad shape. One of the bolts on the heat exchanger was oversized which means the original threads on the exchanger had corroded and then been tapped out! Then the new bolt had eventually corroded causing the exchanger to fail!
This is an important point to make for any new boaters such as myself. According to American Diesel, both the heat exchanger and the transmission oil cooler are consumable items. They have a limited life span. After a certain number of engine hours, they have to be replaced. The heat exchanger is about $600 and the cooler is about $120.
 Unfortunately, not changing out a $120 part caused the failure of the transmission which costs $4500 (brand new)! The new ones (bottom picture) are already on a maintenance schedule to be replaced as recommended by American Diesel!

The rear hatch cover pictured on the left was leaking really bad. The plywood under the teak was badly rotted. If you look closely between the teak and the frame, you can see a gap where the plywood is supposed to be. Every time it rained, water poured into the master berth! Although the teak was sound, there was not much thickness left after years of sanding, so I decided to build a new cover from the frame up. I replace the rotted 1/2 inch plywood with 3/4 inch marine grade plywood. I then covered that with 3/4 inch African Mahogany. I also wrapped the edge of the plywood with 1 x 2 African Mahogany to protect it from water. The original design only used quarter round to protect the edge. You can't see the frame on the new cover pictured on the right because of the overhanging mahogany boards! Finally, in tribute to the original construction, I removed the teak handle from the old cover and installed it on the new one. After a few coats of varnish, the new hatch cover should keep us dry for many years to come!

They say that nothing dealing with a boat is a simple as it seems. "Elixir" lived up to this statement when it came to the whole reason we were able to purchase her in the first place - her inability to get underway. As you read in "The Gamble", we had previously discovered the problem was due to a seized transmission. This is the culprit. But that was the easy part. With no ID plate to tell us what kind of transmission, we took her to a transmission repair shop who claimed to work on Velvet Drive transmissions to tell us the model number and gear ratio. Over two months went by with constant phone calls before they finally advised us that it was a model 72 with a 2.57 gear reduction and that it could not be rebuilt.
We promptly ordered a rebuilt transmission to fill the bill and scheduled the mechanic to come install it. It dropped right in and everything went smoothly until he tried to line up the prop shaft with the tranny and they did not line up!!! That's when we discovered the transmission shop had neglected to tell us that the original transmission was a drop center transmission (with a 2.47 gear reduction ratio). We had ordered an "in line" transmission. Oooops! I immediately jumped on the phone to locate a drop center transmission only to discover that they no longer make them and they are not available in the used and rebuilt market. I finally located one in Ft. Lauderdale, but they would not give me a price until they received my core and decided how much it would cost to rebuild it. They did say it would probably be around 9 - 10 thousand!!! Ouch!!!


Of course, even all that would have been simple, but there were more problems to come. The engine mounts were in horrible shape so it only made sense to replace them while we had the engine in the air. I ordered new mounts from American Diesel before we started the project. But once we removed the old mounts we discovered that the two rear mounts were 1/2 inch shorter than the front mounts and the new ones we had ordered. Phone calls to American Diesel determined that for some reason, someone had installed 4 cylinder mounts on the rear. We were advised these would not hold up long to the weight of our 6 cylinder. And so we had to drop the angle iron another 1/2 inch to compensate for the additional height of the new motor mounts!
But wait - there's more! The front mounts were mounted on a 2x4 spacer. I'm not sure why but I can only surmise that having the angle iron in two heights makes it stronger than one continuous length. Prior to hoisting the engine, I had already cut new 2x4's and pre-drilled the holes for the motor mounts using a new mount as a guide. But when we pulled the old 2x4's out, we discovered they were 1/4 inch thicker than current 2x4's. Huh?

Believe it or not, this difference kept the transmission from lining up with the prop shaft! So, limited with only the circular saw we had on board, we ripped a 1/2 inch piece of 2x4 to add as an additional spacer. It worked! Finally the the shafts were close enough to attach. After that, it was simply the back and forth....and back and forth....and back and forth some more of adjusting the motor mounts to perfectly line up the transmission shaft with the propeller shaft before bolting them together. OK - maybe not perfectly lined up, but within tolerance.
Finally, "Elixir" has a complete power train. The only thing left to do is hook up all the hoses and fill the fluids and we will be able to test her power!


Because the yard had to pull Elixir out at 8a.m. and it was a 3 hour cruise, we had to go over the night before. Our first night spent away from our home marina was in a boat yard! At least we were greeted by a beautiful sunrise!

But the best part was we gained an extra 2 knots in speed!! Our 3 hour trip over became a 2 hour trip back!
When we bought Elixir, she had this old little 6 gallon water heater that you would buy from Home Depot. It worked originally, but I knew it would have to be replaced. It was not built to stand up to a marine environment and it had no way to be heated underway. Within the month, it died. Not only did it die, but it shorted out to the boat and until I discovered it was the cause, when you were in the engine room working, you would get shocked when you touched various pipes. Not ready to install a new one, we went for many months with no hot water on board. I finally rebuilt the decking where the heater goes and installed this new stainless steel 11 gallon marine water heater. Thanks to Sharkbite fittings and Pex pipe, I was able to hook it up in a temporary fashion as I will not be able to permanently run the pipes until I rebuild the engine room. With only days before we leave on our big trip to Captiva Island, I chose not to hook up the piping to allow us to have hot water underway as I did not want to risk messing with the engine cooling system. I will do that when we return. But at least now we have hot water when tied to the dock.


 Elixir also lacked a bimini top when we bought her. At first, I was resistant to Marie's request for a top as it was a big expense just to have some shade. But it did not take me long to see the wisdom in her requests. Without a top, you pretty much can't use the flybridge (which is huge on Elixir) to relax. So at 9pm the night before we departed for Captiva Island, Elixir got a top. I must say she looks good!

One of the things that really bothered me about the boat was this view from the back. The paint was mostly gone and it looked like a working fishing boat instead of a luxury yacht.
Unfortunately, it never seemed to get high enough on the priority list and so I avoided taking pictures from the back and cringed whenever a boat was following us. I knew what they were thinking!
Finally, while we were on our trip to Captiva Island, I took the time to slap a couple of coats of paint on her. What a difference!!!


Another major mechanical problem when we bought the boat was the generator. It was over 30 years old and did not run. We were told it was also frozen up. Shortly after we purchased Elixir, I put a wrench on the crank shaft and turned it, so I knew it was not frozen, but it would not even think about starting. Other things were more pressing and/or cheaper to fix, so the poor genny got put on the back burner. But as we used the boat more and more, it became obvious we needed a working generator. Without it, we could only stay on the hook for 2 nights. Then we had to plug in to a marina to recharge the batteries. We also had no air-conditioning, microwave, or ability to recharge our phones while underway or on the hook. And so we finally decided we had to get her running.
 The first step was to get her to crank. Steve, from Aurora, went below to check the starter. To this day I have no idea what he did, but it only took him about two minutes and he got her to turn over! After years of sitting idle, she only ran for a few seconds before she sputtered out, but it was long enough to see smoke come out of a hose connection on the heat exchanger. Again with the heat exchanger! You can see in the photo above how poor of a condition it was in. So I replaced it with the pretty white one in the photo to the left. I also replaced all coolant lines. Steve also advised me to tighten the belt on the coolant pump but I could not get the bolts on the pump to loosen to allow me to tighten the belt. Entered Jim from Wild Goose. He cut the bolts and pried off the plate that had rusted tight to the chassis. Once off, tightening the belt was a breeze. We tried to fire her up again and she ran! But a quick check of the exhaust found no water coming out, so I shut her down. After a little trouble shooting, I determined the raw water pump was not working. This is an obsolete part that can't be ordered anymore, but after talking with Jim, it was decided to replace the mechanical pump with a new electric pump. It will be wired to kick in whenever the genny is running and seems to be working fine. So we fired her up again and everything was running great. For a minute. Just as Jim was explaining the ins and outs of a generator, it sputtered and died. Jim said it sounded like it ran out of fuel so I checked the valve to make sure it was on. It was. But as I traced it back to the tank, I discovered that when they replaced my fuel lines back in St. Augustine, they left off the line going to the generator! There was no quick way to get that back together. Jim came up with an alternate solution and after a couple of runs to hardware stores, we found enough parts to run a new line from a different location. We fired her up one more time and she ran! Jim showed me how to adjust the frequency and after I got it set, we switched all AC power over to the genny. Even the air-conditioner. It all worked perfectly! From now on, we can stay on the hook as long as we want!! A special thanks to Jim for all the hours he spent helping on this project (and many others).
Ok - not everything is about restoration. Some things are just cool to do. We quickly discovered that when we are steering from the lower helm, we could not see if a boat was behind us. So if we needed to turn in a hurry, we had no way of knowing if we would be turning into another boat. The fix - a back up camera! Now we can see behind us in 17" vivid color while still at the helm! Technology can be great!
All boats have an anchor chain locker. It's a place to store the anchor chain when not in use and is located at the bow of the boat. As the anchor is pulled onboard, the chain automatically goes into the chain locker. On Elixir, the chain locker was just a piece of plywood with no drainage. As the chain was pulled onboard over the years, water saturated the plywood and it was pretty much gone. The whole area looked horrible. After removing the old plywood and grinding down the sides, I replaced the plywood. Then Marie went to work. First she primed the area with Sani Tred Permaflex. After filling the cracks and holes with Liquid Rubber Base, she added a final top coat of Permaflex. Add a couple of scuppers to drain any water that comes in with the chain and we now have a rugged water-tight chain locker!
 |
| In Progress |
 |
| Done!! |

Our old refrigerator slowly began to lose its ability to keep the food cold. At some point it became apparent we would have to swap it out. Unfortunately, when we looked for a replacement, we could not find anything that would fit without going much smaller. The admiral said this one was already too small, so going smaller was out of the question. We found a full size marine refrigerator we liked, but it would have to be relocated unless we wanted to block the view out the window, which we didn't.

 And so we decided to install the new refrigerator somewhere else. As with any project, every decision has a consequence and ours was we now had a big ugly hole where the old refrigerator had been. This would have to disappear. The question was how and with what? Marie had the answer and so we went to work. We wanted it to look built in and so Marie did a great job staining the new wood to match the old.

We ended up with a built in dishwasher, microwave and TV! The TV folds down and slides away in the top drawer when not in use so it does not obstruct our view! Isn't that much better than a little camping size refrigerator?

 Many projects we do on Elixir are not glamorous or even apparent to visitors, but they are necessary none-the-less. New Years eve day, 2014, was too cold and too windy to work on the main project we have going on right now, so we spent the day working inside. Since the day we bought Elixir, we knew we needed to remove old wiring that was no longer used. Boaters have a bad habit of cutting a wire when they don't need it anymore but not removing it. These wires were getting in the way of our current projects and so we spent the day climbing and crawling around the boat tearing them out. Tonight we can celebrate the cleaner Elixir and the New Year!!
 You may recall that we replaced the air-conditioner shortly after purchasing Elixir. When we did, we merely re-installed the new one where the old one had been - under the settee in the Salon. However, the original installation presented some problems. First of all was the noise when you were talking with company. Secondly was the fact that ALL the air went through that one big air duct you see coming out of the A/C towards the top of the picture on the top left. It then blew out one vent which was right behind your head if you were sitting on top of the A/C. Ever been in a hurricane? Next, the return was on the side of the settee, which means all the cold air came out the one vent and traveled the four feet back to the return... around and around. If you were the person sitting on top of the A/C, you froze while everyone else sweated. A bad situation all the way around. Finally, it was wired to a 15 amp circuit breaker, but the heating element required 17 amps. Any attempt to run the heat met with immediate tripping of the breaker.
 When we renovated the anchor chain locker, we noticed how much extra room we had. So we added the shelf in the picture in the upper right and moved the A/C there. We then installed a plenum which allowed us to have more ducts and we installed smaller vents around the boat. We installed the return vents you see on the right in the V-berth (that was a solid wall) and now the air gently circulates throughout the salon and V-berth. No more hurricanes and a more consistent temperature wherever you are at. With the unit down in the V-berth, you can barely hear it running when you are socializing in the Salon. We moved the thermostat to the V-berth to give control of the temperature to any guests that may be staying the night (we will install a second unit in the master-berth later). Finally, we wired it all to a 25amp breaker which allows us to have central heat!!

The Port Side Door, which is the main door we use to board Elixir, had a cracked window and was badly weathered. We removed the glass from the door and had a new window made to fit. While the glass was removed, we sanded and varnished the door. It now has a mirror finish, both on the window and the wood and is much more inviting to visitors to the boat!


So out it came. We bought an 8.2 cf Vitrifrigo marine refrigerator. It has a separate freezer and refrigerator, where before we only had a little freezer compartment, which was pretty much useless. Now instead of buying two bags of ice a day, we can make our own ice!
We built a cabinet to put the new refrigerator in. We had to put it on a base to get it up high enough to clear the step by the door. Since storage space is a premium on any boat, we made the walls on the base removable, so we can store extra food and supplies under the fridge!

Originally, we planned to have a new swim platform built and installed before our upcoming trip. But with Elixir still unable to move from the dock, we began to realize we would not have time to have her pulled onto the hard for the swim platform installation before we left. And so we abandoned the idea of having the new platform built before our trip.
 This presented a problem. Five weeks in the tropics looking at sun soaked sandy beaches without the ability to reach them. The Admiral said that ain't gonna happen! And so I came up with the solution. My redneck swim platform! I just took 2x6 boards and cut them to fit on top of the current swim platform. I drilled holes horizontally and ran three threaded rods through them to hold them together. Then I used 2x6 boards underneath with bolts going straight down through everything to sandwich the boards tight to the existing swim platform. OK, before all you experienced boaters start hollering about how the boards will rot, I only need it to last 2 months and for less than $100 worth of supplies it would be well worth the ability to have a swim platform to use on the trip. And I gotta say, this deck would make any double-wide look high class! I would like to thank Steve from Solemar for his help in installing the platform.
And yes, it holds the dinghy very well. I can launch the dinghy in less than 15 seconds and it only takes about 60 seconds to retrieve the dinghy back into stowed position! With that kind of ease, we can dinghy to any beach anytime which should make the Admiral very happy. And you know the saying: Happy Admiral happy sailor!
One thing you learn very quickly when you get a boat is that storage space is a valuable resource. And so when I was designing the cabinet for the new refrigerator, I realized I had 4 inches of unused space. Four inches!! That's like 5 acres to you landlubbers! I started measuring things and discovered that a can of whatever is a tad over 3 inches. Perfect! I decided to build a can shelf into the refrigerator cabinet. It was just enough width for one can, but all total it holds 63 cans!


To keep the cans from falling out while underway, I devised a bar system using wooden dowels. To pull a can out, you simply lift the bar and grab the can. Let go of the bar and it automatically falls back into place about mid-way down the height of the can.
The final touch is that when the door to the Master Berth is open (which it normally is unless we have overnight guests), it acts as a door to the can shelf so you don't even see the cans! Now where's the next vacant 2 inches?

When we bought Elixir, most of the teak had been stripped of the decks leaving a rough bare looking deck. It was neither comfortable to walk on barefoot nor pretty to look at.
We researched many options on how to deal with the deck, including re-teaking it. In the end, we finally decided to go with LRB/Permaflex.

These are rubber based paints that when they harden, are as tough as a car tire. They also completely water-proof whatever you put it on and can self-level which saved us a lot of sanding!
Here, we have begun coating our decks, starting with the deck above the V-berth. We went with a tan color and I think it looks pretty good! I can't wait to get the rest of the boat done!

As I said before, space is a premium on a boat. Elixir was built with a Liquor Locker under the Helm Bench. It was hard to open (no slides) and couldn't hold much even if we were big drinkers, which we are not. So it was wasted space to us. So I gutted the insides and cut the door off. After re-walling the inside, I mounted two pull-out shelves. Finally, I installed the old door back onto the lower shelf so that when it is closed, it all looks original. But when you pull it open, it is a pantry! It actually holds quite a bit of stuff and with the ball bearing slides, its all easy to get to!

The major project for this winter was switching over the chain and cable steering to hydraulic steering. The chain and cable, although effective, was stiff and difficult to turn quickly in close quarters docking. Additionally, at least one pulley had separated from the fiberglass held mount and was replaced with the erector set contraption shown below to keep us underway. I worried that it, or another of the 7 pulleys the cable traveled through would give way at a critical moment. So out with the old and in with the new.

Then began the installation of the new system. If I had to do it over again (I hope not), there are things I would do differently. I had no experience with hydraulic steering so I researched and guessed a lot. Its amazing how little information is on the internet regarding the

I chose the Capilano 1275 pump even though it was slightly larger than what was called for on a

After 6 months of working almost every weekend, I finally got it all installed. The old sprocket was replaced by the pump to the left, and the shake down cruise was successful! Elixir now has hydraulic steering!

Now that we finally decided how we wanted to redo the deck, we figured we could waterproof the ladder going from the mid-deck to the flybridge with the same permaflex rubber material. That way, we would not have to keep it varnished, oiled, or otherwise and it would cut down on the maintenance of Elixir. Although it was not in horrible shape, it was wood and you could tell it had been some time since anything had been done to it.

It took several coats of permaflex to seal the ladder, but when it was finally done, it was a great improvement over the way it had been. Plus the added non-tread will make it safer for us to come and go from the flybridge while underway.

Another problem with Elixir was her electrical panels. Years of adding new wiring runs and rewiring old ones had caused havoc on the back of both the AC and DC panels. Apparently forever in a hurry, prior owners had merely run wire after wire directly from point A to point B without any regard as to what the wire was running in front of. The result was a wire locker so crammed with wires that you could neither open the breaker panel to work on it, nor access anything inside the wire locker! Here you can see the wires restricting the AC panel from opening any further.

Lately I have been busy varnishing. I've been trying to get everything on the boat varnished for the first time, while not letting the wood that has already been varnished go bad. Keeping up with the old
 stuff is easy. Just do a light sanding and throw a coat or two on top...good for another year. But the new stuff.....that's a different story. First you have to sand off whatever is on parts of it and get it down to bare wood and smooth. Then you have to throw eight coats of varnish on it. Do you know how hard it is to get eight days of no rain in South Georgia? Especially when I am only on the boat on weekends, and not every weekend.
Anyway, all this to say I haven't been posting because you've seen the varnish so I didn't want to bore you with more.

But after three years, I finally got around to that new paint job Elixir has needed from the start. My first paint project was underneath the brow. As you can see above, it really needed it. I tried a custom paint called Signature Finish. A friend told me about it. As you can see in the picture on the left, this stuff is great! It's easy to use and gives a mirror finish. It also fills in small cracks and holes to give a smoother finish than what you started with! Now I can't wait to paint the rest of the boat.
 One of the things that has bothered us since we bought Elixir is the discoloration of the brow caused by water running off of the brass supports for the windshield. What looks like a shadow running down from each support in this picture is actually a greenish-brown streak on the brow. It was very obvious in real life.
Our big concern was that if we painted the brow, it was just get discolored again. They had to be replaced! I took them to a metal shop to see if they could fabricate some out of stainless steel. Their answer was basically - NO.

Apparently, it would take a small loan from Fort Knox to even think about replicating this in stainless.
They did say they could make "L" brackets for me, but I didn't want an "L" bracket on the front of my boat.
Here you can see the green color typical of brass that is exposed to the elements.
 After much thought, we came up with the idea of just rubber coating our existing brackets. So Marie went to work and over a period of several months she completely encapsulated each bracket with perma-flex, the same liquid rubber we have been using on the deck. Now it should be water proof and thus, not streak our brow! And I think they look great!
You may notice in the picture that we have also painted the brow. We couldn't put new brackets on an old paint job!

Continuing our on-going project to refinish the deck, both to make it look better and to water-proof it, we next tackled the mid-deck. This deck is a large area towards the back of the boat that could be used as a living area except that the deck is slippery when underway. As you can see, it also looked terrible!

So we coated it with permaflex liquid rubber and added non-skid. Now the deck is safe, water-proof, and beautiful!

You may recall that the first renovation I completed after purchasing Elixir, was to repaint the mast (You can scroll up to the top to remember how bad it looked). Three years later the mast was becoming a concern. Its weight was causing the fiberglass deck on the flybridge to cave in, which in turn was causing the mounting bolts to begin to push against the ceiling in the saloon. We had already removed the boom about a year ago to alleviate some of the stress, but it was still a problem.

Between moving the mast off of the flybridge and removing the guide wire that was bolted to the deck in the middle of the flybridge, it gave us a lot more space on the flybridge! Also, without the height needed to support a boom, I was able to shorten the mast by two feet, which means many more bridges that we can pass under without needing them to open! Finally, I had a hinge installed six feet below the top, which will allow us to get under the lowest bridge on the Great Loop that we hope to make someday.

One of the things I did not like aesthetically when we first bought Elixir, was the ship's bell. It was made of brass and had the characteristic patina which just made the boat look old. I tried to polish it and it looked great when I did, but within a month it was old and cruddy looking again.
So I decided to swap it out for a stainless steel bell. What a difference!

 When we bought Elixir, there was a vented door missing on the port side that allowed air circulation to the engine room. You can see the opening above the gunnel underneath the most forward port side window. It originally had a teak door frame which I removed before I remembered to take a picture. Because the door was missing, there was nothing to keep the rain, bugs, or anything else, out of the engine room. I knew it needed to be replaced, but I did not want to have a new wooden door made, as I am trying to remove unnecessary wood to lesson how much varnishing I have to do.
Speaking of having to varnish..... Marie has been helping me out in that department by making covers for some of the wood that seems to need varnishing frequently. Below you can see how nice they look! The covers have been making the varnish last much longer and I have not had to re-varnish since we put the covers on! Thanks Marie!


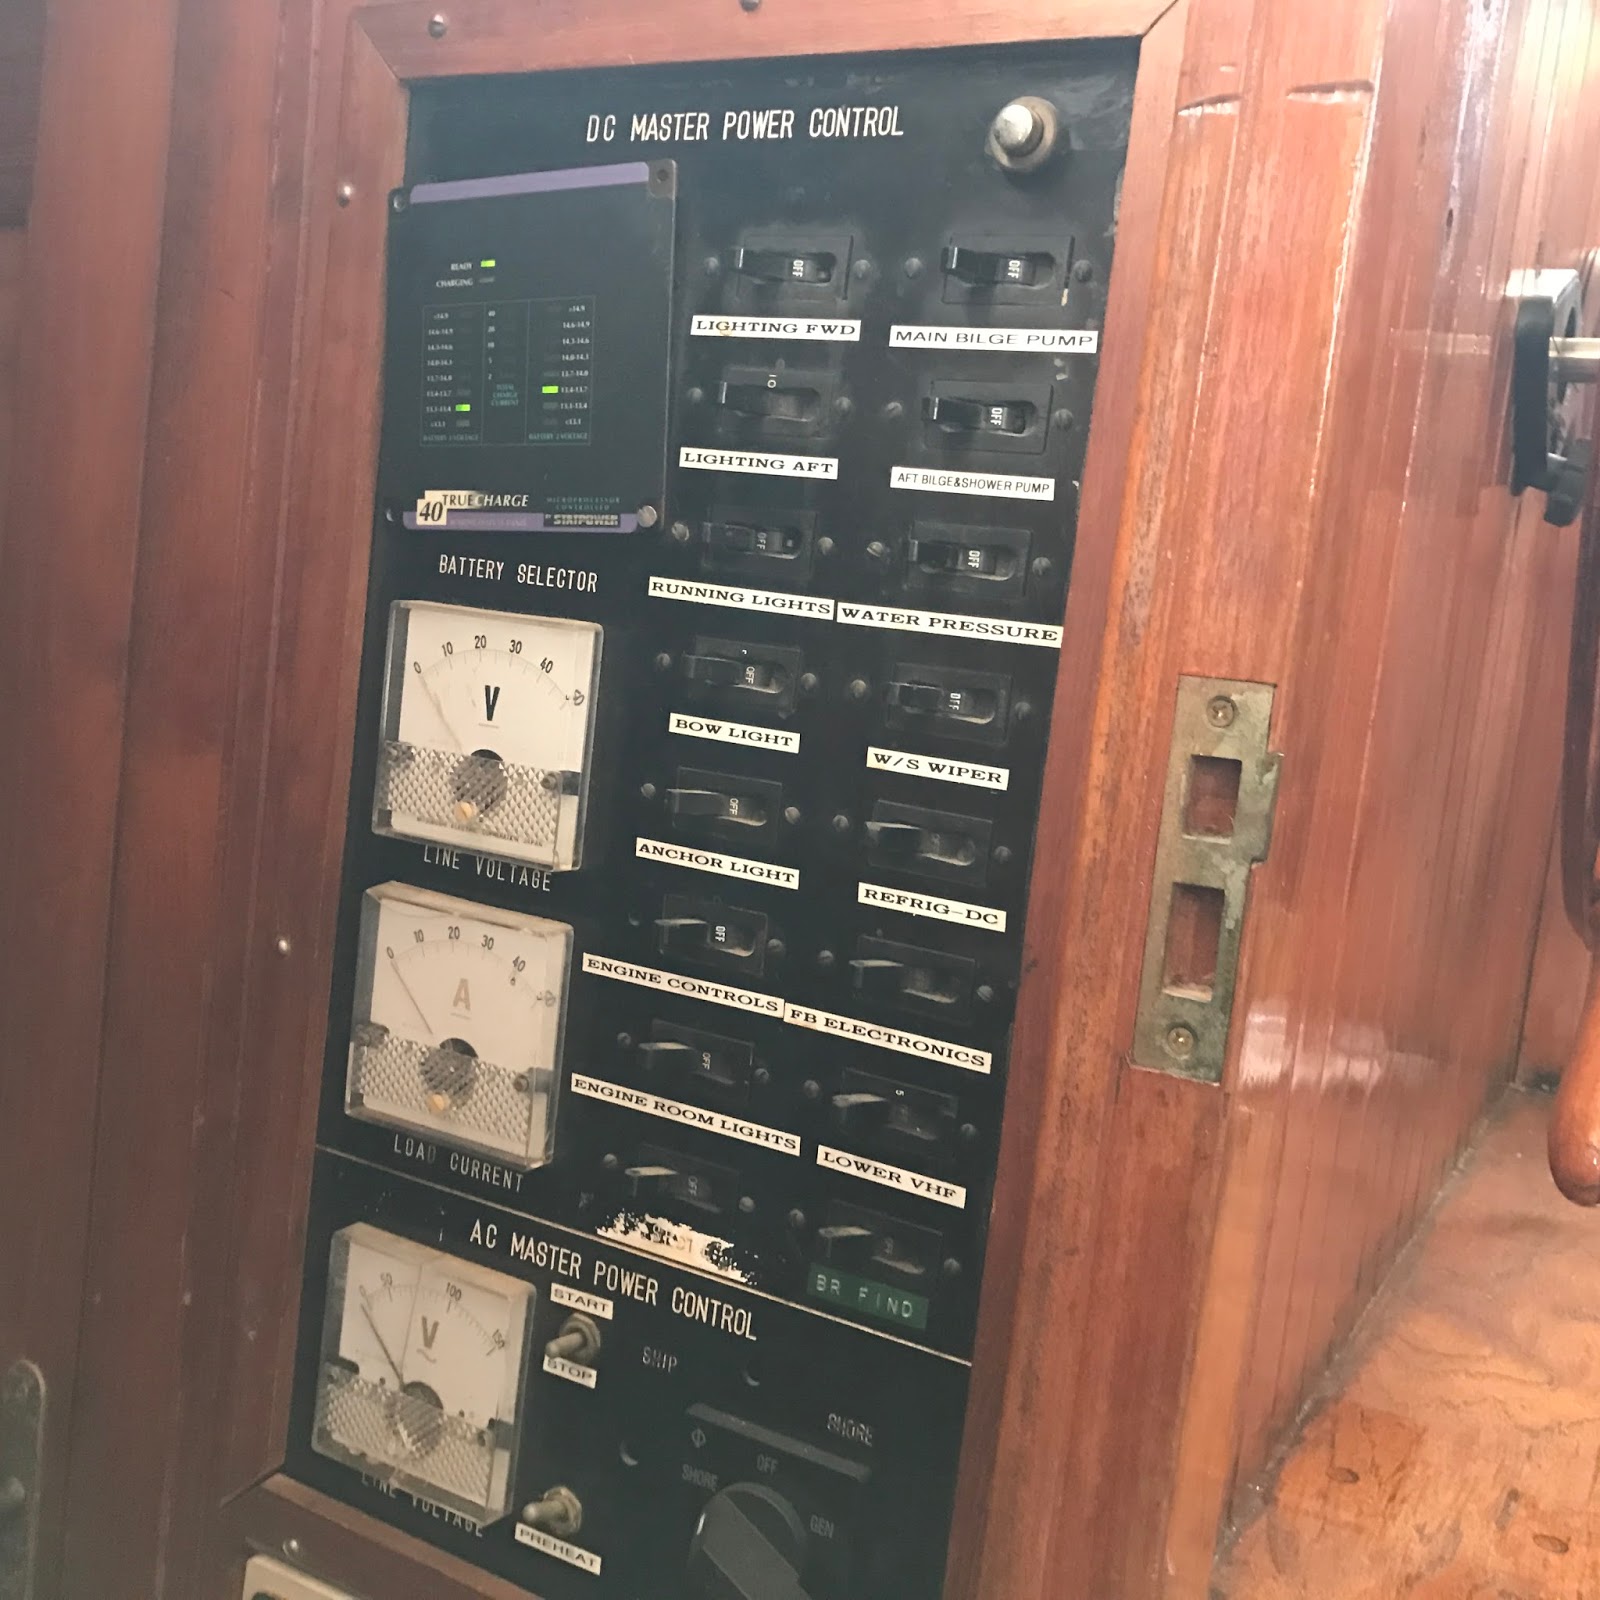
Elixir had an old DC electrical panel. It was probably original to the boat. It was not very pretty to look at and some of the switches were no longer labelled properly. We just had to know what they really controlled! The meters did not work and worst of all, the panel was not mounted on a hinge. That meant every time I wanted to work on the back of it, I had to unscrew the entire panel and pull it and the maze of wires behind it, out. It was next to impossible to re-wire any of the switches. And if you let go of the panel while it was not mounted, the whole thing wanted to fall down onto the main A/C input switch mounted directly beneath it!

Now I just have to wire up all those switches!
Adding to the good looks of the panel, each label is back-lit so you can see what the switch goes to even in the dark. It also has indicator lights to let you know which breakers are on!
 Since the day we bought Elixir, we have always had to hold our nose every time we flushed our toilet..... not because of us, but because of the salt water! Apparently it has something to do with all the microscopic critter fritters dying in the hoses only to be then flushed into the toilet (called a "head" on a boat). Anyway, we had long decided to change to fresh water flush in order to improve the aroma on the boat.
In addition to the odor issue, we were restricted in our travels because we had no holding tank. Even though we had a waste treatment system that was ten times better than your local municipal waste treatment system, because of uneducated politicians bending to political pressure from uneducated constituents, we are restricted from discharging that treated waste into the same waters that the much less treated waste from municipal systems is dumped. These waters are known as no-discharge zones and include the Florida Keys and parts of the ICW in North Carolina. You may recall on our cruise to Miami and north to South Carolina, these zones prevented us from going any further south and north.

We chose to install the system under the master bed as seen in the picture above, in a cavity not readily accessible and not currently being used.
The waste is sent from the head to the holding tank seen in the picture to the left. When the level in the tank reaches a certain level, it is transferred to the Purasan EX on the far side where it is treated to kill all bacteria, and then discharged into the water. The Purasan allows us to use fresh water which has already stopped the odor problem! And if we are in a no-discharge zone, we can shut off the Purasan and the waste is stored in the holding tank until we are clear of the no-discharge zone! Florida Keys here we come!
 One of the things we had been working on for some time, was our forward head. When we bought Elixir, the forward head was mostly unusable. It had been designed as a wet head, kind of a shower with a bathroom in it. As such, the wood had rotted and the shower, pictured on the wall here, no longer worked. There was no toilet and just a bare wood floor. Only the sink worked, but it had the old fashioned separate faucets for hot and cold water. Bottom line....it had to go. So this became one of our major projects for this year.
 We started by gutting the head. We tore out everything, including the window. Then we began to rebuild. First we laid a new sub-floor, which had to be installed in pieces due to the tight dimensions of the head. Marie then used floor leveler and a lot of sanding to make the floor smooth and level between each piece and the screw holes. She did a great job! We found some peel and stick linoleum flooring that was extra thick so it can be grouted. Once Marie completed the job, your can't tell it is not tile, and the copper look is great!
 Then I began to fabricate and install the cabinetry. Each piece had to be made individually to fit the angles of the walls since nothing was perpendicular. Even the drawer had to be cut and installed to pull out at an angle or it would hit a wall! The two upper cabinets had to hide the air conditioning ducts, so I came up with the idea of inserting the granite back-splash under them so that it would not look like they were sitting on the counter-top.
 Marie suggested a little counter-top along the back so the cabinets
 would not look out of place, a great idea! We had the granite counter-top professionally installed and then we added a vessel sink which gave us more drawer space.
 Finally, we installed a Raritan Elegance toilet with fresh water flush. We also installed an electrical outlet, lighted mirror, towel bar and safety grab bar. Marie made a curtain for our new window.
After 4 years, we finally had a working forward head, which will make it easier for company to come along on a cruise! (That's an invitation in case any of my family and friends missed it)
Since it is a fresh water flush and the master head is still currently a salt water flush (future project), we find we prefer to use our new head over the one in the master berth so we are getting plenty of enjoyment from the completion of this project!

So we changed it out with two new proper ones. We also added pressure gauges so that we would know when the filters needed to be changed and brass drain fittings so that we could drain off the water without breaking prime on the fuel side. Each filter is supplied by a separate fuel tank and is totally switchable so that if one clogs up we just switch to the other and keep going!
 We have never been able to use ac electricity in the hook. That means no microwave, no TV, no coffee, no smoothies, etc! I know, who lives like that?
So I finally got around to installing a Magnum MS2000 full sine wave inverter. Now we have electricity anywhere we go!
It also is a battery charger, so it replaced our old battery charger to charge our house bank.

The original hand rails on the boat were weak and rickety and made the boat look old. So we are replacing all of them with stainless steel tubing. The are stronger, more modern, and a lot less maintenance.
We have completed the installation on the fly bridge and are very pleased with the results!
************ Other Miscellaneous Repairs, Renovations and Upgrades:
* Replaced faulty Starter Motor
* Replaced non-functioning Engine Stop Solenoid
* Replaced exahust elbow
* Installed Garmin 740s Chart Plotters
* Replaced Jabsco manual flush toilet in Master Head
* Installed Coast Guard approved Life Ring
* Replaced all dock lines
* Replaced broken oil pressure switch
* Repaired non-functioning tachometer
* Installed Garmin 18HD Radar
* Replaced undersized fenders with proper size
* Re-routed fuel fill hose to stop fuel from backing up during fueling
* Upgraded bridge mounted fish finder to (2) Airmar Model P79 In-Hull, Adjustable Angle Transducers
* Installed Xantrex Linklite Battery Monitor
* Installed access port on flybridge side-wall to run wires from mast to inside of boat
* Replaced old 30 amp alternator with new 90 amp alternator
No comments:
Post a Comment